 Raise your hand if you’re like me and love wearing white clothes, but no matter what you do, they just don’t last? Try as I might, bleach as much as I can, my white clothes just don’t last. It’s such a pity, too, because I love how white makes my pasty pale skin look more tan than it is! I have been mulling this idea of dyeing my white clothes for years, to see if I could get more life out of them.
If you know me, it’s rare that I have an idea and just go and DO it right away. Odds are, if I do a project, I have been thinking about it for some time, or waiting for just the right time to do it. This was no different, and it was strategic. I saved up my white clothes for about five years in hopes that I could maybe do something with them.
I had about 4-6 shirts, a cami, and a skirt that I wanted to to try dyeing. At this point, what is there to lose? If it doesn’t work well, no harm – no foul, and I find some alternative to dispose of the clothing. If it does work, then I have some pretty cool clothes that I can get a few more months or years of life out of.
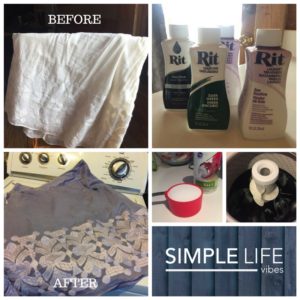
Here’s What You’ll Need To Dye Clothes In A Washing Machine
- Washing Machine
- Bucket
- Hot Water
- Salt (1 cup) or Vinegar (1 cup)
- Wood Paint Stir Stick
- Rubber gloves (unless you want dyed skin too!)
- Rit Dye (I got two different colors of the liquid product)
- Rit Fixative
How To Dye Clothes In A Washing Machine Steps:
- Wash all of your clothes. This helps the dye apply more evenly. Mine were already clean, so I used my bucket to soak the clothes in hot water until they were fully wet.
- Start filling up the washing machine with the hottest water you can and fill it enough that the clothes can move freely.
- Shake the liquid dye thoroughly and then pour into the machine. Use your paint stick to mix into the water well.
- If you are dying things like cotton and linen (natural fibers), they recommend adding a cup of dissolved salt into the dye bath. Dissolve 1 Cup salt in a bucket of 4 Cups hot water and then pour that into your dye bath. If dyeing silk or nylon add one cup of white vinegar to the dye bath.
- If your wet garments are cool, dunk them in a bucket of hot water and then smooth them out a little to prevent wrinkles and then dunk them into the washing machine that has the dye bath ready to go.
- Important! Let the items soak for at least 30 minutes, or no more than one hour before the rinse cycle begins. This might mean that you need to set an extended cycle or reset your cycle so that you don’t rinse the dye out too soon.
- Let the cycle finish its course!
- Once your machine finishes the cycle, run a cycle with the Rit fixative. This helps the dye to “set in” and not run in future washes.
- Dry or hang-dry your garments.
- Run a wash cycle to get any residual dye out of your machine. I ran an empty cycle with water and bleach. Just to be sure, I ran a normal wash after that with a bunch of rag towels to make sure there wasn’t any dye that would come out on any future loads.
Sound simple enough? Yea, it actually is, but it sure can be nerve-wracking to do this. Here are a few tips I have after doing this myself:
- If you have had pit stains, odds are, the dye will go on unevenly. Most of my cotton shirts that had any sort of elastic in them didn’t work well and dyed VERY uneven. But hey, worth a shot, right?
- Shake the dye bottle more than you think you need to. Sing ‘Happy Birthday’ two times through while shaking and you should be good!
- Let your clothes sit in the dye for a little. I completely missed this step, so my navy blue dye turned my skirt purple. Now, I actually love the color it turned out, but if I had let the garments soak in the dye longer I now know that I would have gotten something closer to what I had thought I was buying. Live and learn!
- If you have a brand new washing machine, you may not want to use this technique. I have a machine that’s easily 15 years old and has hard water stains on the agitator already, but there were faint (almost impossible to see) signs that I had run a dye bath through it. Just know your level of comfort here before you do it. If your machine is a few years old, and past the prime reselling value that you could get on Craigslist, you should have no problem running this through. If you’re worried, use the hand and bucket technique – a little more work, but still good. Maybe we’ll tackle this technique another day!
- Wash your dyed clothes separately from your main wash, just in case any dye wants to seep out in the future. I’ve never had an issue, but they warn against it. Luckily for me, the main thing that worked for this project is my Banana Republic skirt, which I would probably wash separately regardless!
Dyeing clothes worked part-way for me. I was able to bring new life to a $75 skirt that my hubby gave me as a gift back when we were dating! I now can probably give that skirt another 5-10 years, making that a great win out of this project. Of course, I had a number of shirts NOT work. I’m okay with that. I’ll find another use for it. This project was definitely worth the time to experiment with and I can tell you right now that I WILL be dyeing more stuff in the future!
Have you had any experience dyeing clothes that you’d like to share? We’d love to hear your success stories!